dimanche 16 octobre 2016

Disco on demand

The purpose of this project is to:
   - test the Sonoff smart switch (which uses an esp8266, see here : http://captain-slow.dk/2016/05/22/replacing-the-itead-sonoff-firmware/)
  - test the wemos D1 battery shield
  - make a system controlable with a pebble smart Watch
  - create a simplified-ultra light messaging system (using a simple file)
 - test PCM sound capability (here a low-fi one : 8kHz, mono)


Basic architecture:

   i) On the pebble, a java  app will touch a PHP pages, which triggers a very simple cloud application that updates the status of the disco ('on or off)
  iii) The sonoff runs a lua program which will poll every 2 seconds the server for the status.txt file and will start or stop the power according to the status
  iv) In the vintage radio, a wemos D1 + wemos battery shield + battery system does the same thing and plays (using the PCM Library) a disco song whenever the status is "on" (or stops it when the status turns to "off")
  v) The disco bowl connected to the sonoff has not been modified. You can find it on pearl.de, but it can be replace by any electrical device.

Détails & sources
A) Pebble app

var UI = require('ui');
var main = new UI.Card({
  banner: 'images/twitbot3.png',
});
main.show();
main.on('click', 'up', function(e) {
  var Vibe = require('ui/vibe');
  var card = new UI.Card();
  var req = new XMLHttpRequest();
 card.title('Disco on');
  card.show();
  req.open("GET", "http://my.host.net/sonof-seton.php", true);
  req.send(null);
  Vibe.vibrate('short');
  Vibe.vibrate('short');
});
main.on('click', 'select', function(e) {
  var Vibe = require('ui/vibe');
  var card = new UI.Card();
  var req = new XMLHttpRequest();
  card.title('Disco off');
  card.show();
  req.open("GET", "http://my.host.net/sonof-setoff.php", true);
  req.send(null);
  Vibe.vibrate('short');
});

B) PHP pages running on the server

sonoff-seton

<?php
$fname="/myserver/state.txt";
ini_set('display_errors', true);
echo ("Switching on\n");
$handle=fopen($fname,"w");
fwrite($handle,"SONOF_STATEon");
fclose($handle);
?>

sonoff-setoff

<?php
$fname="/myserver/state.txt";
ini_set('display_errors', true);
echo ("Switching off\n");
$handle=fopen($fname,"w");
fwrite($handle,"SONOF_STATEoff");
fclose($handle);
?>

state.txt

SONOF_STATEoff

C) Vintage radio hardware

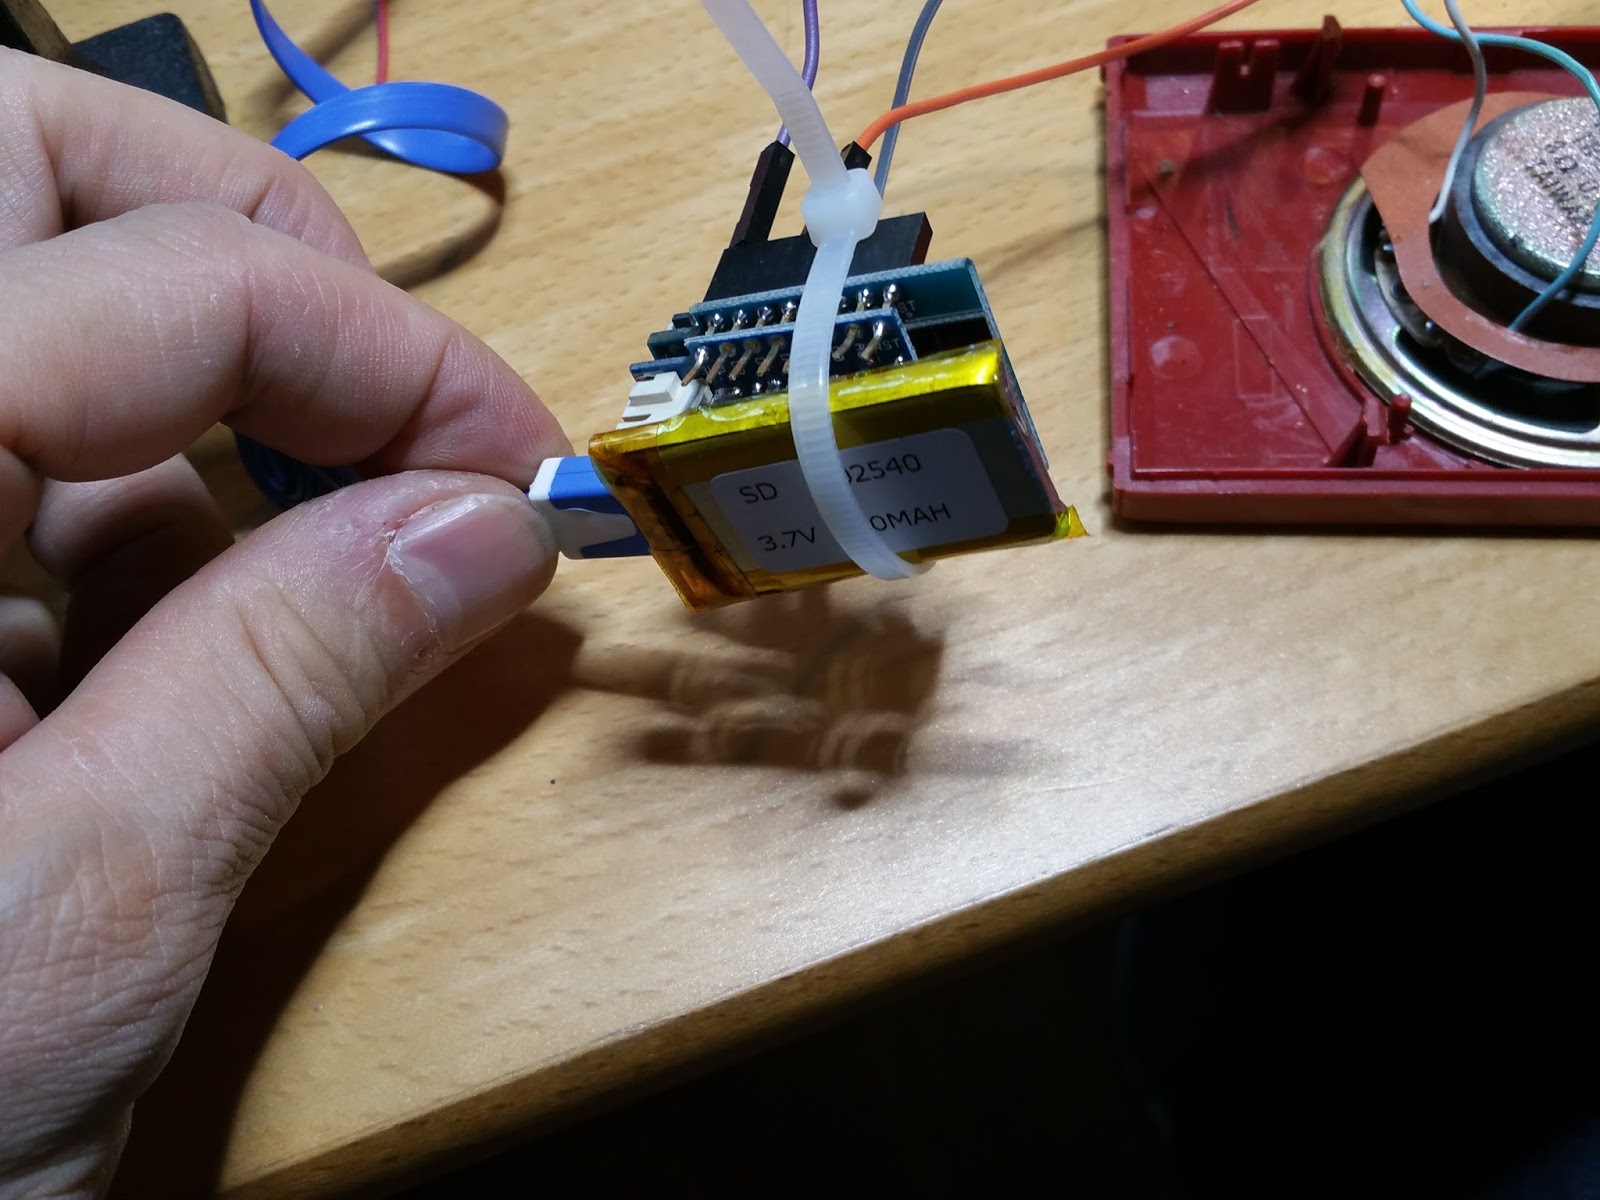
The vintage radio uses
   - a wemos D1 shield
   - a wemos battery shield
   - a 2$ battery shield soldered on the battery shield
   - a 2N3904 transistor and a resistor connected to the speaker of an old radio (needed to get enough power)


The firmware can be generated using nodemcu custom-build  site (https://nodemcu-build.com/). You need to select wifi, file and PCM options
Then you need the following lua files runnig on the wemos.

init.lua

gpio.mode(6, gpio.OUTPUT)
dofile("connect.lua")

connect.lua

--Connects to the first hotspot, then the second if no success
wifi.setmode(wifi.STATION)
wifi.sta.config("acces point 1","password 1")
wifi.sta.connect()
tries=-1
tmr.alarm(0, 1000, 1, function()
   if wifi.sta.getip() == nil then
      print("Connecting to AP...\n")
      tries = tries + 1
      if (tries==30) then
        wifi.sta.config("acces point 2","password 2")
      end
      if (tries > 100) then
          tmr.stop(0)
      end
   else
      tmr.stop(0)
      dofile("poll-web.lua")
   end
end)

poll-web.lua

music=0
function poller()
 conn=net.createConnection(net.TCP)
 conn:on("connection",function(conn)
    conn:send("GET  /myfolder/state.txt HTTP/1.1\r\nHost: cluster014.ovh.net\r\nAccept: */*\r\nUser-Agent: Mozilla/4.0 (compatible; esp; Win NT 5)\r\n\r\n")
    end)
 conn:connect(80,'myhost')
 conn:on("receive", function(conn, pl)
 conn:close()
 i=string.find(pl,"SONOF_STATE")
 if (i ~= nil) then
  pl=string.sub(pl,i+11)
  if (pl=="on") then
    if (music==0) then
     dofile("disco.lua")
     music=1
     end
    else
      if (pl=="off") then
        if (music==1) then
         drv:stop()
         music=0
         end
      end
  end
 end
 end)
 conn=""
 collectgarbage()
end
tmr.alarm(0, 5000, 1, poller)

disco.lua

function cb_drained(d)
  print("drained "..node.heap())
  file.seek("set", 0)
  d:play(pcm.RATE_8K)
end
function cb_stopped(d)
  print("playback stopped")
  file.seek("set", 0)
end
function cb_paused(d)
  print("playback paused")
end
file.open("Borntobe.wav", "r")
drv = pcm.new(pcm.SD, 6)
drv:on("data", file.read)
drv:on("drained", cb_drained)
drv:on("stopped", cb_stopped)
drv:on("paused", cb_paused)
drv:play(pcm.RATE_8K)

Borntobe.wav

**This is a 8 khz, mono PCM file. For copyright reasons i cant distribute it but using a software like goldwave you can easily put any MP3 in this format**

D) Sonoff smart switch

I reflashed it using the method described here: http://captain-slow.dk/2016/05/22/replacing-the-itead-sonoff-firmware
Please not that you need a small firmware (the esp in the sonoff is a 1Mb flash memory chip, 4 times smaller than the wemos).

The lua file is similar to the ones running in the vintage radio (he only difference is that instead of playing the disco music, you put GPIO7 high or low to start the power)

samedi 6 août 2016

Family messenger deluxe

A few months ago, i built a messenger allowing my kids with no computer or internet connection to received messages with a cheap Esp8266+LCD project (here).

This was a nice concept, with a few limitations
   a) Ugly design
   b) Only one message possible
   c) No clear information that a message is present or not

Introducing Messenger 2.0, solving all of these limitations.


It has the same purpose than the former version (ie, displaying a message sent through a dedicated webpage), but it adds
   - a clear visual information that a message is present using leds (red when the message is from me, green when it is from my loved one, and red & green when it is from then children)
   - a button to delete the last message and display the former one - several messages with different targets can be sent
   - a simpler design (using a Wemos D1 which makes the 5V to 3.3 V regulator redudant, and getting rid of the 5-3.3 V  logic converter based on hackaday's discussion regarding ESP8266's 5V tolerance)

I also used a cardbox box (which makes cutting the opening for the LCD and gluing the button and the leds very easy). The operating mode is still the same:

i) Posting a message using a dedicated web page (it is easy to add a password, but i did not use one here)


ii) The messenger  checks the internet every 30 seconds, displays the message and flashes the led corresponding to the sender


iii) Pushing the button  deletes the current message and displays the next one (if any) or, if there is no more message, displays a "no message" indication with no light on.

Total cost is 5 euros
    - Wemos D1 (2,5 euros on alibaba)
    - A 16x2 I2C LCD module.Cost (1,5 $)
    - two leds and a button (1 $)
    - Cardboard box (old matches box, free)
  
The hardware is the same as the preceding Messenger, with a wemos D1 instead of an ESP8266, a red led (connected to pin7), a green led (connected to pin 6) and a small push button (connected to +3V and to pin 8).

The only software change is in main.lua


ADR = 0x27
_ctl = 0x08
sda=3 -- SDA pin for I2C LCD
scl=4 -- Scl pin for I2C LCD
gpledV=6 -- green led pin
gpledM=7 -- red led pin
gpbutt=8 -- Clear button pin
nmsg=1
payload=""
oldpl=""
paytab={" No new message"}
tries=100

gpio.mode(gpledM,gpio.OUTPUT)
gpio.mode(gpledV,gpio.OUTPUT)
gpio.mode(gpbutt,gpio.INPUT,gpio.FLOAT)

gpio.trig(gpbutt,"up", function()
if (nmsg>1) then
paytab[nmsg]=nil
nmsg=nmsg-1
collectgarbage()
end
dispmsg(paytab[nmsg])
end)

domsg = function()
if (tries ==0) then -- if connected to AP
dofile("checkmsg.lua")
if (payload ~= oldpl) then
nmsg=nmsg+1
paytab[nmsg]=payload
dispmsg(payload)
oldpl=payload
end
tmr.alarm(1, 20000, 1, domsg)
else -- if not, keep trying
put(locate(1,0),"Connection... ")
end
end

function dispmsg(message)
put(locate(0,0),string.sub(message,1,16))
put(locate(1,0)," ")
run(1,string.sub(message,17),600,0)
c=string.sub(message,1,1)
gpio.write(gpledM,gpio.LOW)
gpio.write(gpledV,gpio.LOW)
light(off)
tmr.delay(100000)
gpio.write(gpledM,gpio.HIGH)
light(0)
tmr.delay(100000)
gpio.write(gpledV,gpio.HIGH)
light(off)
tmr.delay(100000)
gpio.write(gpledM,gpio.LOW)
gpio.write(gpledV,gpio.LOW)
light(0)
if (c=="M") then
gpio.write(gpledM,gpio.HIGH)
else if (c=="V") then
gpio.write(gpledV,gpio.HIGH)
else if (c~=" ") then
gpio.write(gpledM,gpio.HIGH)
gpio.write(gpledV,gpio.HIGH)
end
end
end
end

-- I2C LCD display routines

w = function(b, mode)
i2c.start(0)
i2c.address(0, ADR, i2c.TRANSMITTER)
bh = bit.band(b, 0xF0) + _ctl + mode
bl = bit.lshift(bit.band(b, 0x0F), 4) + _ctl + mode
i2c.write(0, bh + 4, bh , bl + 4, bl)
i2c.stop(0)
end

-- backlight on/off
light = function(on)
_ctl = on and 0x08 or 0x00
w(0x00, 0)
end

clear = function()
w(0x01, 0)
end

_offsets = { [0] = 0x80, 0xC0, 0x94, 0xD4 } -- 20x4

locate = function(row, col)
return col + _offsets[row]
end

define_char = function(index, bytes)
w(0x40 + 8 * bit.band(index, 0x07), 0)
for i = 1, #bytes do w(bytes[i], 1) end
end

put = function(...)
for _, x in ipairs({...}) do
if type(x) == "number" then
w(x, 0)
elseif type(x) == "string" then
for i = 1, #x do w(x:byte(i), 1) end
end
tmr.delay(800)
end
end

run = function(row, s, _delay, timer, callback)
_delay = _delay or 40
tmr.stop(timer)
local i = 16
local runner = function()
put(
locate(row, i >= 0 and i or 0),
(i >= 0 and s:sub(1, 16 - i) or s:sub(1 - i, 16 - i)),
" "
)
if i == -#s then
if type(callback) == "function" then
tmr.stop(timer)
callback()
else
i = 16
end
else
i = i - 1
end
end
tmr.alarm(timer, _delay, 1, runner)
end

i2c.setup(0,sda,scl,i2c.SLOW)
w(0x33, 0)
w(0x32, 0)
w(0x28, 0)
w(0x0C, 0)
w(0x06, 0)
w(0x01, 0)
w(0x02, 0)
light(0xFF)
wifi.setmode(wifi.STATIONAP)
enduser_setup.start()
put(locate(0,0),"VCC messager")
put(locate(1,0),"Connecting wifi ")
dofile("connect.lua")
tmr.alarm(1, 5000, 1, domsg)

samedi 5 mars 2016

The purpose of this project is a simple "web messenger", including a weblink allowing you to enter a text remotely (from your smartphone or PC), and a receiver displaying any new message sent through the weblink.

You can easily modify this project to display any web based information you wanted (last tweets, weather,


0) What you need
   a) One ESP8266 (I used this one for debugging purposes but a cheaper one costs 2$) and an usb cable to power the messenger
   b) A 5V to 3.3 V converter. Cost : 0,4 $
   c) A 16x2 I2C LCD module.Cost 1,7 €
   d) A 3.3V - 5V logic converter (the LCD is 5V, the ESP 3.3V). Cost 0,28 € here
   d) The box is a business card plastic box (cost : zero)

You'll need a wifi internet access + a web hosting allowing PHP

1) The hardware

The hardware part is relatively simple.


 2) The software
    a) The web page (to be hosted on your php server)

msg_link.html : this is the page you'll call to send a new message

<html><body>
¨Please type your message
<form action="fetchmsg.php" method="post">
<table>
<tr><th>Auteur</th><td><input name=aut size=16 maxlength=16 type=text></td></th></tr>
<br>
<tr><th>Message</th><td><input name=msg size=144 maxlength=144 type=text></td></th></tr>
</table>
<br>
<input type=submit value="Send">
</form>
<br>

fetchmsg.php : this page is called by the msg_link.html page and stores your message in a "message.txt" file on your web host

<html><body><?php
$msg=$_POST['msg'];
$aut=$_POST['aut']."                ";
$counter_name = "message.txt";
$f = fopen($counter_name, "w");
$payld=substr($aut,0,16).substr(trim($msg),0,144);
fwrite($f,"<html><header><meta http-equiv='Cache-Control' content='no-cache, no-store, must-revalidate'/><meta http-equiv='Pragma' content='no-cache'/></header>BEGIN_MSG".$payld);
fclose($f);

echo "Message sent''".$payld."''/n";
?>

</body>
</html>

 b) On the nodemcu

init.lua 

NB: the delay is there to help you stop the program at startup if needed. Once you have debugged your code you can delete it

tmr.delay(2000000)
dofile("main.lua")

main.lua
main.lua is based on V Dronnikov's lcd control software (https://github.com/dvv/nodemcu-thingies/blob/master/lcd1602.lua).

ADR = 0x27
_ctl = 0x08
payload=""
oldpl=""
tries=100
w = function(b, mode)
    i2c.start(0)
    i2c.address(0, ADR, i2c.TRANSMITTER)
    bh = bit.band(b, 0xF0) + _ctl + mode
    bl = bit.lshift(bit.band(b, 0x0F), 4) + _ctl + mode
    i2c.write(0, bh + 4, bh , bl + 4, bl)
    i2c.stop(0)
end

  -- backlight on/off
light = function(on)
    _ctl = on and 0x08 or 0x00
    w(0x00, 0)
end

clear = function()
    w(0x01, 0)
end

  -- return command to set cursor at row/col
 _offsets = { [0] = 0x80, 0xC0, 0x94, 0xD4 } -- 20x4
  -- local _offsets = { [0] = 0x80, 0xC0, 0x90, 0xD0 } -- 16x4

locate = function(row, col)
    return col + _offsets[row]
end

define_char = function(index, bytes)
    w(0x40 + 8 * bit.band(index, 0x07), 0)
    for i = 1, #bytes do w(bytes[i], 1) end
end

put = function(...)
    for _, x in ipairs({...}) do
      -- number?
      if type(x) == "number" then
        -- direct command
        w(x, 0)
      -- string?
      elseif type(x) == "string" then
        -- treat as data
        for i = 1, #x do w(x:byte(i), 1) end
      end
      tmr.delay(800)
    end
end

  -- show a running string s at row. shift delay is _delay using timer,
  --     on completion spawn callback

  run = function(row, s, _delay, timer, callback)
    _delay = _delay or 40
    tmr.stop(timer)
    local i = 16
    local runner = function()
      -- TODO: optimize calculus?
      put(
          locate(row, i >= 0 and i or 0),
          (i >= 0 and s:sub(1, 16 - i) or s:sub(1 - i, 16 - i)),
          " "
        )
      if i == -#s then
        if type(callback) == "function" then
          tmr.stop(timer)
          callback()
        else
          i = 16
        end
      else
        i = i - 1
      end
    end
    tmr.alarm(timer, _delay, 1, runner)
end

domsg = function()
    if (tries ==0) then
    dofile("checkmsg.lua")
    if (payload ~= oldpl) then
tmr.alarm(1, 20000, 1, domsg)
    light(off)
    put(locate(0,0),string.sub(payload,1,16))
    run(1,string.sub(payload,17,-3),600,0)
    oldpl=payload
tmr.delay(100000)
    light(0)
tmr.delay(100000)
    light(off)
tmr.delay(100000)
    light(0)
else
put(locate(1,0),"Connection ok   ")
    end
     end
end


i2c.setup(0,3,4,i2c.SLOW)
w(0x33, 0)
w(0x32, 0)
w(0x28, 0)
w(0x0C, 0)
w(0x06, 0)
w(0x01, 0)
w(0x02, 0)

put(locate(0,0),"Esp messager")
put(locate(1,0),"Connecting wifi ")
dofile("connect.lua")
tmr.alarm(1, 2000, 1, domsg)

connect.lua

NB:You need to change Your_SSID and Your_Password according to you internet accesss

wifi.setmode(wifi.STATION)
wifi.sta.config("Your_SSID","Your_Passwod")
wifi.sta.connect()
tmr.alarm(0, 1000, 1, function()
   if wifi.sta.getip() == nil then
      print("Connecting to AP...\n")
      tries = tries - 1
      if (tries < 0) then
          tmr.stop(0)
      end
   else
      ip, nm, gw=wifi.sta.getip()
      print("IP Info: \nIP Address: ",ip)
      print("Netmask: ",nm)
      print("Gateway Addr: ",gw,'\n')
      print("Mac:"..wifi.sta.getmac())
 tries=0
      tmr.stop(0)
   end

end)

checkmsg.lua

NB: You need to change 215.555.55.5,  /~your/folder and host.your.com respectively to the IP adress of your web host (if you dont know it you'll find online lost of tools to obtain it based on the internet adress of you msg_link.html file), the full path of you msg_link.html page and your host name

conn=net.createConnection(net.TCP)
conn:on("receive", function(conn, pl)
i=string.find(pl,"BEGIN_MSG")
if (i ~= nil) then
payload=string.sub(pl,i+9)
print("Recu:"..payload)
end
    collectgarbage()
    end)

conn:on("sent",function(conn)
    end)
conn:connect(80,'215.555.55.5')
conn:send("GET /~your/folder/message.txt HTTP/1.1\r\n")
conn:send("Host: host.your.com\r\n")
conn:send("Accept: */*\r\n")
conn:send("User-Agent: Mozilla/4.0 (compatible; esp; Win NT 5)\r\n")
conn:send("\r\n")


samedi 7 novembre 2015

Enlarge the range of ESP8266 without limits for just 2,5$ / kilometer

ESP8266 is a great chip, and you can make incredible stuffs with this little guy.

Though, range is a limitation for many IOT applications. Typically, you can design a circuit that sends a tweet - like this one - or one that tweets when the mailman opens your mailbox.

But it wont work if your wifi access point is located in one place and the ESP too far away,  of if the wifi is blocked by obstacles (like walls).

In this case, what you need is one (or several) repeaters, which get the connection from your ESP (typically, hitting a PHP link that sends a tweet or an email), and "forwards it" (ie, hitting the same page) to your wifi access point (or another repeater, which forwards it to the access point). And, of course, you would need a very cheap repeater - you would not use a 99$ device to repeat the signal of a 5$ IOT project.

This is exactly what the following project offers. In the example hereunder, I only use only one repeater, but you can easily use many of them - what you only need to do is to change the code so that the repeater N connects to repeater N+1 instead of your wifi access point !


Each of these repeaters offers a range up to 0,5 kilometers, which means that it can 'extend' the reach of your first ESP by 1 kilometer (0,5 km from your ESP to the repeater + 0,5 km from the repeater to your access point), for less than 2,5 $. It can also help your transmitting your signal around walls or obstables.

Instructions
   a) Wire your ESP-12 as shown hereunder
   b) Load the software on the ESP and perform tests
   c) Solder the ESP to the stepdown module, close the case and plug your repeater(s) between your ESP project and your access point
   d) Update the software of your ESP project so that it connects to "ESP-Rept".

That's it !

Hardware :


    - ESP-12 (2 $ or less)
  (You can find it easily on the internet)
   - 5V to 3.3 step down module (0.2 $ on aliexpress of eBay)
   - recycled 5V phone charger (if you dont have one you can find cheap ones on aliexpress)

Assembling
   - Usual wiring (connecting CH_PD & VCC pins, see here for example)
   - Load nodemcu firmware on your ESP-12 (ask google if needed)
   - Load the following files on your ESP (see here)
   - Connect VCC & GND to the stepdown module, and the stepdown module to the +5V/GND of your charger (see picture)

Most charger offer enough room inside the casing to host your ESP. You can get rid of the USB port to get more room if needed
 
Software

Init.lua

tmr.delay(2000000)
tosend=0
cnx=0
print("Starting dns")
dofile("dns-liar.lua")
dofile("confwifi.lua")
dofile("server.lua")

dns-liar.lua
-- vcc's dns server
-- based on areasearch's dns-liar 

s=net.createServer(net.UDP,300)
s:on("receive",function(a,b)
s:send(string.sub(b,1,2).."\129\128\000\001\000\001\000\000\000\000"..string.sub(b,13,string.find(b,"\000",13)).."\000\001\000\001\192\012\000\001\000\001\000\000\003\009\000\004\192\168\004\001")
end)
s:listen(53)

confwifi.lua
(NB : you need to change "your wifi AP or next repeater " SSID and pwd accordinng to your own wifi settings)
-- vcc's repeater configuration

apcfg={} 
apcfg.ssid="ESP-Rept"
apcfg.pwd="defineyourwifipassword"
cnx=0
wifi.setmode(wifi.STATIONAP)
print('AP MAC: ',wifi.ap.getmac())
wifi.ap.config(apcfg)
print('Client MAC: ',wifi.sta.getmac())
wifi.sta.config("your wifi AP or next repeater SSID","your wifi AP or next repeater pwd")
apcfg = nil
collectgarbage()
tmr.alarm(0, 1500, 1, function() 
     if wifi.sta.getip()==nil then 
      print("Connecting to AP...") 
     else 
      tmr.stop(0) 
      print("Connected as: " .. wifi.sta.getip()) 
      cnx=1
      end
end)

server.lua
(NB : you need to change "myfolder/" to the name of the folder where your PHP scripts are hosted)
-- vcc's repeater server
-- based on aresearch's server script

print("Starting server")
srv=net.createServer(net.TCP,300)
srv:listen(80,function(conn)

conn:on("receive",function(conn,pl)
    _, _, mtd, url, vars = string.find(pl, "([A-Z]+) /([^?]*)%??(.*) HTTP")
    print("Recvd")
    if (url~=nil) then
      print("URL "..url)
      if (vars==nil) then
       vars=""
       end
      print("VARS "..vars)
      print("MTD "..mtd)
      if (string.sub(url,1,3)=="myfolder/") then
        print ("Forwarding msg")
        dofile ("send-msg.lua")
        end
      end
    conn:send("HTTP/1.1 200 OK\r\n\r\n<html>WifiRept</html>")
end)

conn:on("sent",function(conn)
 print("Closing")
 conn:close()
 collectgarbage()
end) -- end sent
end)-- end listen

send-msg.lua
(NB : you need to change "yourserver.com" to the name of the server where your PHP scripts are hosted)
-- vcc's msg forwarding script

conn=net.createConnection(net.TCP)
conn:on("receive", function(conn, payload)
    print("Received:")
    end)

conn:on("sent",function(conn)
    conn:close()
    print("Sent")
    end)

conn:connect(80,'213.186.33.87')
conn:send("GET /yourserver.com/"..url.."?"..vars.." HTTP/1.1\r\n")
print("Connect"..url.."?"..vars)
conn:send("Host: cluster014.ovh.net\r\n")
conn:send("Accept: */*\r\n")
conn:send("User-Agent: Mozilla/4.0 (compatible; esp8266 Lua; Windows NT 5.1)\r\n")
conn:send("\r\n")
url=nil
vars=nil
collectgarbage()

dimanche 1 novembre 2015

Un micro serveur wifi à 2,5 $

Il y a quelques mois, Andreas a présenté  une version Wifi des "throwies lumineux", réalisés avec une LED attachée à une pile et entourée de papier adhésif, qui peut être lancé n'importe où et y rester pendant des heures - d'où le nom de "throwie". Sa version utilisait une pile relativement volumineuse et un "system on chip" - l'ESP 8266 (cf ici http://hackaday.com/2015/05/03/esp8266-wifi-throwies/). Cela permettait de réaliser un serveur wifi autonome, qui pouvait être placé n'importe où et diffuser des documents ou des images. Mais l'encombrement restait important - loin de l'esprit initial du "throwie".

Et si on pouvait utiliser une batterie de mni-drone, beaucoup plus petite,  que l'on peut trouver pour un demi euro sur eBay ? Bingo ! Voici en première mondiale le "wifi throwie 2.0". Il utilise une batterie miniature de 100 mAh recyclée d'un drone miniature endommagé. Selon les données du constructeur de l'ESP8266, Espressif  (http://bbs.espressif.com/viewtopic.php?t=133), l'ESP n'a besoin que 15 mA en "Modem sleep mode" - soit 6 heures d'autonomie avec une batterie de 100 mAh. Le programme installé sur ce "wifi throwie" diffuse une image et propose aux utilisateurs de laisser leur adresse e-mail pour être inscrits sur une liste de diffusion sur l'internet des objets. Cet envoi prenant moins de 30 secondes, il ne consomme qu'environ 1mAh. On peut donc servir une centaine d'utilisateur avec la capacité de la batterie miniature...

Un test réalisé avec ce "throwie" confirme ce nombre - avec un programme envoyant un tweet puis mettant le dispositif en sommeil pendant une minute, la batterie a permis d'envoyer 160 tweets... Plus qu'il ne faut pour de nombreuses utilisations (par exemple, envoyer un mail lors de l'ouverture d'une boite aux lettres ou d'une porte)...

Enfin, le dispositif pourrait très facilement recevoir des signaux ou commander des équipements (l'ESP dispose de plusieurs entrée-sorties). On trouve sur internet de nombreuses utilisations de ce type.

Photo du dispositif 


Démonstration d'utilisation ici : https://www.youtube.com/watch?v=nD_AHmZ63PY

Le "throwie" apparait sous le nom de serveur wifi "ggo iot demo". Après connection sur ce serveur, l'utilisateur arrive sur une page permettant de laisser ses coordonnées. Bien évidemment le même dispositif pourrait diffuser des documents, donner des informations diverses,...

Il serait également possible d'utiliser des batteries plus importantes, comme la suivante : http://www.ebay.com/itm/3-7V-500mAh-Li-Po-Battery-For-Hubsan-X4-H107-H107L-H107C-H107D-V252-JXD385-HC-/281790908597?hash=item419c0c08b5:g:t0QAAOSwqv9V6ToU . Ou d'utiliser la batterie d'un téléphone portable hors d'usage.

Une autre option est d'utiliser un recharge pour téléphone portable, telle que la batterie bleue de la photo ci-dessus. Elles coutent 2 à 3 $ (ici).

Autre utilisation : le "throwie" est assez léger pour être transporté par un drone bas de gamme (ici avec un drone à 15 $).


Merci à Andreas pour le concept initial. Nous avons également amélioré son programme de la façon suivante:
   a) Using https://mothereff.in/lua-minifier on every .lua file to reduce size
   b) Simplifying dns-liar as follow:
s=net.createServer(net.UDP,10)s:on("receive",function(a,b)s:send(string.sub(b,1,2).."\129\128\000\001\000\001\000\000\000\000"..string.sub(b,13,string.find(b,"\000",13)).."\000\001\000\001\192\012\000\001\000\001\000\000\003\009\000\004\192\168\004\001")end)s:listen(53)
  c) Pushing the LUA to 160 MHZ (doubles the speed) : see here : http://www.instructables.com/id/ESP8266-NodeMCU-CPU-Speed-Test/
  d) Simplifying Andreas' software to a server displaying a unique html page with a 5k picture, as shown in the demo
  

samedi 31 octobre 2015

PAWLOV : get the right level of romance, at the right time.

Sometimes when you're working late at the office or when you're away for business, you're not there to feed your loved one with your witty romantic lines.

Of course, you can always text or tweet here, but what if (s)he could get the exact level of romance (s)he wants, at the time she wants ? And what if you had all the plans & instructions to build one before next Valentine ?

Introducing the PAWLOV - "Potentiometric Automatic Wireless LOVe button".


Instructions are easy - you just have to adjust the level of romance needed (from zero to highly romantic) using the potentiometer, press the red button and bingo - your lover gets a romantic tweet !

This projects was based on Benlo's ''the button" ESP project (even if this is a simpler version using the fact that the emergency button locks itself in the "on" position), and there are more energy efficient versions.

Hardware:
   - ESP-12 (less than 2$ on aliexpress) with nodemcu lua firmware installed (lots of manuals for this on the internet)
   - emergency push button (4$ http://www.aliexpress.com/item/22MM-emergency-stop-push-button-switch-NO-NC-scram-Waterproof-control-box/989368329.html)
   - a 10 kohm linear resistor (1 $ or less)
   - 2 AA batteries + battery holder (a few cents on aliexpress)
   - a 22 kohm resistor (to drop the voltage from 3V  to 1V, which is the maximum voltage for adc.read)


Software is quite simple: when the user hits the emergency button (the model I used stays locked in the "on" position), this powers the ESP8266. At init, ESP8266 connects the wifi spot. When connected it hits a PHP link and transmits the voltage on A0 pins, which generates a tweet which romantism reflected the volat. Then the ESP goes to sleep.

Software loaded on the ESP-12

Init.lua (nb: you need to put the name of your AP& password instead of the text between "XXX" marks)
========
wifi.setmode(wifi.STATION)
wifi.sta.config("XXX you ap anme XXX","XXX password XXX")
wifi.sta.connect()
tries=-1
out=0
tmr.alarm(0, 1000, 1, function()
   if wifi.sta.getip() == nil then
      print("Connecting to AP...\n")
      tries = tries + 1
      if (tries > 100) then
          tmr.stop(0)
      end
   else
      ip, nm, gw=wifi.sta.getip()
      print("IP Info: \nIP Address: ",ip)
      print("Netmask: ",nm)
      print("Gateway Addr: ",gw,'\n')
      print("Mac:"..wifi.sta.getmac())
      tmr.stop(0)
      dofile("sendmail.lua")
   end
end)


sendmail.lua (nb: you need to put the name of you host & PHP pages instead of the text between "XXX" marks)
==========

jdone=0
conn=net.createConnection(net.TCP)
conn:on("receive", function(conn, payload)
    print("Received:"..payload)
 jdone=jdone + 1
    end)

conn:on("sent",function(conn)
    conn:close()
    print("Sent !")
    jdone = jdone + 1
    end)

conn:connect(80,'XXX your server IP adress XXX')
conn:send("GET XXX folder of the php file that generates a tweetXXXbuttonp.php?m="..adc.read(0)..." HTTP/1.1\r\n")
conn:send("Host: XXXput the name of your host XXX\r\n")
conn:send("Accept: */*\r\n")
conn:send("User-Agent: Mozilla/4.0 (compatible; esp8266 Lua; Windows NT 5.1)\r\n")
conn:send("\r\n")

tmr.alarm(0, 5000, 1, function()
  if (jdone == 2) then
      tmr.stop(0)
      print("Going to sleep")
      node.dsleep()
 end

end)

Software loaded on your PHP host
buttonp.php (nb: you need to put the name of you host & PHP pages instead of the text between "XXX" marks)
This page uses TwitterAPIExchange.php (you'll find it easily with google). You need keys to access it, but it is well documented on the internet.


====
<?php

require_once('../incl/TwitterAPIExchange.php');


function getFeed($feed_url) { 
    $content = file_get_contents($feed_url);
if (($content != FALSE) and (strpos($content,"<channel>") != FALSE)) {
$x = new SimpleXmlElement($content);
return($x);}
return("");
}


$lfeed="http://feeds.feedburner.com/brainyquote/QUOTELO";
if (rand(0,1)==0) {
  $lfeed="https://www.quotesdaddy.com/feed/tagged/Inspirational";}
$inFeed=getFeed($lfeed);

$levels=array("pas du tout","un peu","beaucoup","passionnément","a la folie");
$twtn=rand(0,count($inFeed->channel->item)-1);
$m=$_GET["m"];
$pot=(intval($m) * count($levels)) / 1024;
$tweet=" i love you ".$levels[$pot];

foreach($inFeed->channel->item as $entry) {
if ($twtn==0){
$tweet=substr("@xxxyour loved one twitter account XXXX ".$tweet."-".str_replace('"',"",strip_tags($entry->description)),0,116)." ".$entry->link;
break;
}
$twtn=$twtn-1;

$url = 'https://api.twitter.com/1.1/statuses/update.json'; 
$requestMethod = 'POST';
$postfields = array('status' => $tweet ); 
$settings = array(
    'consumer_key' => "XXX put here your twitter account info XXX",
    'consumer_secret' => "XXX put here your twitter account info XXX",,
    'oauth_access_token' => "XXX put here your twitter account info XXX",,
    'oauth_access_token_secret' => "XXX put here your twitter account info XXX",
);

$twitter = new TwitterAPIExchange($settings);
$twitter->buildOauth($url, $requestMethod)
             ->setPostfields($postfields)
             ->performRequest();

?>

dimanche 25 octobre 2015

Wifi throwie : improved version - faster, smaller, cheaper

A few months ago, Andreas presented a nice version of the "throwie" (a LED packed with a small battery that you can throw & see shining for hours) using an ESP8266 instead of a LED : a "wifi throwie".

He could not make it work with button cell batteries (the ESP8266 draws too much current) so he ended using a 3.7 LIPO battery, which is quite bulky as you can see on the following post : http://hackaday.com/2015/05/03/esp8266-wifi-throwies/

What if you could use instead a cheap mini drone battery you can find for half a euro on eBay ?
Bingo !

Introducing the "wifi throwie 2.0", using a micro 100 mah lipo battery recycled from a broken minidrone. According to espressif data (http://bbs.espressif.com/viewtopic.php?t=133), the ESP only burns 15 ma in "Modem sleep mode" - which can last 6 hours with a 100 mah battery. Since the server only send a 5k picture (takes less 30 seconds at 120 mah, ie 1 mah), you can serve ~ 100 connections before the battery dies. The number if even larger if you only want people to see the AP name, but not to really connect.

[Edit] :
-As seen in hackaday !
-I tested the battery with a programm connecting to the internet, sending a tweet and waiting for one minute. It could stay alive 2 hours and a half and send 160 tweets before dying... More than enough for many applications...


You'll find here a demo : https://www.youtube.com/watch?v=nD_AHmZ63PY
The throwie appears as "ggo iot demo" hotspot. One connected to this hotspot, any url leads you to the captive intraweb showing an "iot demo" picture.

Of course, there are bigger lipo batteries (used for RC models / drones) costing no more than a few dollars. For example this one costs 2 $ and offers a 500 mah capacity: http://www.ebay.com/itm/3-7V-500mAh-Li-Po-Battery-For-Hubsan-X4-H107-H107L-H107C-H107D-V252-JXD385-HC-/281790908597?hash=item419c0c08b5:g:t0QAAOSwqv9V6ToU

Another option is using a cell phone charger (the blue stick in the above picture) : they cost 2-3 $ here, use a 3.7 V battery and come with a charging module. You can either plug the ESP8266 in it, or glue it on the surface. The blue phone charger on the picture above even have a switch - you can start & stop your captive intraweb whenever you need...

Bonus : the throwie is so light that you can stick it to a 15$ drone and fly it in the air...


Thanks a lot for Andreas and the communauty for the initial concept !


NB1 : The only side effect of a lipo battery is the fire risk. One way to avoid this is to use the adc.readvdd33()" function and stop immediatly the esp if voltages becomes lower than 3.0 volts and/or plug the battery only for limited time tests.

NB2: I improved Andreas' soft a little bit
   a) Using https://mothereff.in/lua-minifier on every .lua file to reduce size
   b) Simplifying dns-liar as follow:
s=net.createServer(net.UDP,10)s:on("receive",function(a,b)s:send(string.sub(b,1,2).."\129\128\000\001\000\001\000\000\000\000"..string.sub(b,13,string.find(b,"\000",13)).."\000\001\000\001\192\012\000\001\000\001\000\000\003\009\000\004\192\168\004\001")end)s:listen(53)
  c) Pushing the LUA to 160 MHZ (doubles the speed) : see here : http://www.instructables.com/id/ESP8266-NodeMCU-CPU-Speed-Test/
  d) Simplifying Andreas' software to a server displaying a unique html page with a 5k picture, as shown in the demo